Zoom
Zoom Updates
Currently, Zoom can be accessed through the SSO login. If you have trouble accessing
this, check out the video below to access Zoom. You will need to login with your @sbccd.edu
email address.
Starting next school year, 2025-2026, Zoom recordings will only be available for a
year. Other recordings that were made prior to July 2024 will be automatically deleted
by October 2, 2025. To prepare for this transition, it is best to archive any Zoom recordings you want.
Below are instructions on how to do so.
To see the Zoom recordings retention policy from the CCC TechConnect Office, please
select the following link: CCC TechConnect Zoom Recordings Retention Policy.
Need Help Logging into Zoom SSO?
How to Access the SSO for by SBCCD Distance Education
How to Download from Zoom and Upload
The video only has music playing, but if you would like written directions, there
are steps below the video. Additionally, if you would like to jump to a specific program
for uploading, you can choose the appropriate chapter from the video's progress bar.
Step 1: Download from Zoom
- Log in to your Zoom account using your District email and password.

- Select "Recordings & Transcripts" from the left-hand side of the screen. You may have
the option of viewing Cloud and Local Recordings. Make sure to select Cloud Recordings.
If that option is not shown it means that you automatically record to the cloud. You
can select a range of dates or scroll to the recordings you plan to download.
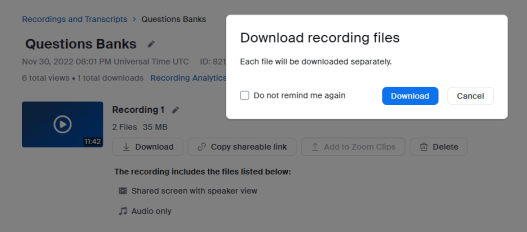
- Click the name of the recording you wish to download.
- In the window that appears, click the Download button. This will download all files
associated with the recording, including the audio transcript. You may want this file
to use as your captioning file.
Step 2: Store Your Recordings for Sharing
You can store your videos in permanent cloud storage: 
- Canvas Studio - Recommended for instructors who share videos in their Canvas classes and for whom
auto-captioning or the Zoom caption file will work. From there you can upload videos
to studio and add or upload captions. Once done, you can embed or create public links.
- Office 365/OneDrive - Recommended for non-instructional videos that may be shared on websites. First,
access Office 365 via the "Logins" tab on the campus website then select OneDrive.
You will want to upload the MP4 of your video that includes the Audio Transcript.
You should not upload/share videos that do not have captioning/audio transcripts due
to accessibility standards. You can upload videos, embed, or provide a share link
in Canvas, but there may be issues with "permissions."
- 3CMedia - Recommended for instructors who need professional captioning (offered on a limited
basis) or for instructors who need to share their videos outside of their Valley or
Crafton classes. You will need an account and should use your SBCCD email when signing
up. Register for a 3CMedia account, then upload you video recordings then share videos
in Canvas through embedding, uploading, or linking.
Storing your Videos for Sharing
| |
Canvas Studio |
3C Media |
YouTube |
OneDrive (Microsoft Stream) |
| File Formats |
Standard Formats (MP3, MP4, WMV etc) |
Standard Formats (MP3, MP4, WMV etc) |
Standard Formats (MP3, MP4, WMV etc) |
Standard Formats (MP3, MP4, WMV etc) |
| Download Restrictions |
Yes |
Yes |
No |
Yes |
| Auto Captions |
Yes |
Grant Funded |
Yes |
Yes |
| Create captions and edits |
Yes |
Yes |
Yes |
Yes |
| File Upload Size Limits |
10 GB |
1 GB |
256 GB or 12 Hrs |
??? |
| Total Storage Limit |
None at this time |
None at this time |
None |
??? |
| Canvas Integration |
Yes |
Yes |
Yes |
Yes |
Step 3: Update Links to Videos in Canvas/On Your Website
If you previously shared your Cloud Recordings in Canvas or on a Website, you will
need to update the links using the Sharing Guides above.
How do I create hyperlinks to external URL?
00:07: How do I create hyperlinks to external URLs in the Rich Content Editor? 00:12:
There are several ways to add external hyperlinks using the Rich Content Editor or
RCE. 00:18: First, select the text that you want to hyperlink. 00:22: To insert a
link from the toolbar, click the Link icon and select the External Links option. 00:28:
The "Insert Link" modal opens and the selected text will be pre-filled in the "Text"
field. 00:34: Paste or type the URL for your hyperlink in the Link field. 00:38: Click
the "Done" button. 00:40: The text will briefly flash before turning into the hyperlink.
00:44: Then the text will appear as a hyperlink in the RCE. 00:48: To create a hyperlink
using the menubar, click the Insert menu, select the Link option, and select the External
Links option. 00:56: Fill the fields in the Insert Link modal and click "Done". 01:00:
Alternatively, you can create external hyperlinks using keyboard shortcuts. Select
the text for your hyperlink. Then press Ctrl+K on a PC Keyboard or Cmd+K on a Mac.
01:14: Fill the fields in the Insert Link modal and click "Done". 01:18: Once the
RCE content is saved, external hyperlinks automatically open in a new browser tab
when clicked. 01:26: This guide covered how do create hyperlinks to external URLs
in the Rich Content Editor.
How do I edit or remove hyperlinks in the Rich Content Editor?
00:07: How do I edit and remove hyperlinks in the Rich Content Editor? 00:11: After
adding a hyperlink in the Rich Content Editor, or RCE, you can edit it from the Link
Options menu. You can also remove hyperlinks. 00:21: When you click on a link in the
RCE, a popup menu appears. 00:26: To remove a hyperlink, select the "Remove Link"
option. 00:30: The link will be removed but the text will remain. 00:34: Click on
the text "here". 00:40: Select "Remove Link" from the Link options dropdown. 00:44:
TO edit a link, select "Link Options" from the popup menu that appears when you click
in the hyperlink in the RCE. 00:52: Enter "Section 1.2-1.6" in the appropriate field.
01:03: The hyperlink will be updated in the RCE to reflect your changes. 01:08: To
remove multiple links, highlight the text that contains the links you want to remove.
01:14: Then click the Link icon in the toolbar and select the Remove Links option.
01:19: All links in the selected text will be removed. Remember to save changes in
the RCE before leaving the page. 01:27: This guide covered how to edit and remove
hyperlinks in the Rich Content Editor.
00:07: How do I create hyperlinks to external URLs in the Rich Content Editor? 00:12:
There are several ways to add external hyperlinks using the Rich Content Editor or
RCE. 00:18: First, select the text that you want to hyperlink. 00:22: To insert a
link from the toolbar, click the Link icon and select the External Links option. 00:28:
The "Insert Link" modal opens and the selected text will be pre-filled in the "Text"
field. 00:34: Paste or type the URL for your hyperlink in the Link field. 00:38: Click
the "Done" button. 00:40: The text will briefly flash before turning into the hyperlink.
00:44: Then the text will appear as a hyperlink in the RCE. 00:48: To create a hyperlink
using the menubar, click the Insert menu, select the Link option, and select the External
Links option. 00:56: Fill the fields in the Insert Link modal and click "Done". 01:00:
Alternatively, you can create external hyperlinks using keyboard shortcuts. Select
the text for your hyperlink. Then press Ctrl+K on a PC Keyboard or Cmd+K on a Mac.
01:14: Fill the fields in the Insert Link modal and click "Done". 01:18: Once the
RCE content is saved, external hyperlinks automatically open in a new browser tab
when clicked. 01:26: This guide covered how do create hyperlinks to external URLs
in the Rich Content Editor.


